BPSK Project

EEmaginations.com is a participant in the Amazon Services LLC Associates Program. Any purchases you make from the links you click on this site, earns me a small commission, which helps keep this site up and running for you.
Introduction
The BPSK project is a project I worked on in college, which, as of late, turned into a hobby with the more recent availability of affordable, commercial off the shelf software defined radios (SDRs), i.e., (RTL-SDR, ADALM-PLUTO). The objective of this project is to wirelessly transmit a message from one SDR, and then receive and decode the message using either the same, or another SDR. The project will require some knowledge of digital communication systems, RF theory, digital signal processing, and proficiency with Matlab. The overall goal of this project is to have a greater understanding and appreciation of how digital communication systems work, and how we are surrounded by the application of this project in everyday life, i.e., sending and receiving text messages between friends over vast distances using devices that output very little power.
Requirements
To get started, you will need a few things:
HARDWARE
- Computer
- PC/Mac capable of running MATLAB
- For comparison, I am using a mid-2010, Macbook Pro with 8GB of RAM installed, and can run this project with no problem
- Minimum 1 USB port
- ADALM-PLUTO SDR (Link Below)
- Full duplex, USB powered radio
- Configurable between 325 MHz to 3.8 GHz
- Can be software modified to operate between 70 MHz and 6 GHz by following the instructions here: https://www.rtl-sdr.com/adalm-pluto-sdr-hack-tune-70-mhz-to-6-ghz-and-gqrx-install/
- Package comes with two antennas and one USB, power cable
- RTL-SDR (Optional – Link Below)
- USB powered, receive only radio
SOFTWARE
- MATLAB
- Version 2017a or higher (I am running 2019b)
- Requires the following toolboxes:
- Communication Systems Toolbox
- DSP System Toolbox
- Signal Processing Toolbox
- Communications Toolbox Support Package for Analog Devices ADALM-Pluto Radio
- Communications Toolbox Support Package for RTL-SDR Radio
- PuTTY
- Open source, terminal emulator, console program
- Used to modify the software of the ADALM-PLUTO to open operational frequency range of radio
ADALM-PLUTO Review
Unless you have access to a programmable, RF signal generator, you will need to purchase, at a minimum, the ADALM-PLUTO SDR to complete this project. Although other SDRs are available, I have found the PLUTO to be the best solution for the project for the following reasons:
- Price
- One of the least expensive, commercially available, full duplex radios
- Amazon link to PLUTO is above; however, radio can also be purchased from Analog Devices, DigiKey, and other stores
- One of the least expensive, commercially available, full duplex radios
- Designed for students and hobbyists
- Easy to use and simple to deploy
- Works with Mac OS/Windows/Linux
- USB powered device
- MATLAB/Simulink Support
- Out of the box, this radio is ready to be used with MATLAB/Simulink
- MATLAB support toolbox for PLUTO radio comes with many ready to run, built-in examples
- Performance Characteristics
- Software upgradeable to have RF bandwidth of 70 MHz to 6 GHz
- 12 bit ADC/DAC
- 65.2 kSPS to 61.44 MSPS sample rates
- 7 dBm Transmit Output Power
Project MATLAB Files
Although you do not need them to use the radios, I have developed MATLAB functions, specific to this application, to be used with the ADALM-PLUTO and RTL-SDR radios. The files contained in the zipped folder below, are to be placed into your MATLAB directory:
The zipped folder contains MATLAB functions I’ve created to perform the following tasks:
- Generate text messages and covert messages to binary
- Generate frame structure for transmitting data
- Frame structure contains data guard followed by preamble (synchronization sequence), followed by message in binary format
- BPSK modulate frame
- Initialize PLUTO transmitter
- Apply pulse shape filtering to frame prior to transmission
- Transmit frame repeatedly via PLUTO radio
- Initialize PLUTO, or RTL-SDR receiver
- Receive and record transmitted message
- Apply matched filtering to received data prior to compensation/decoding
- Compensate message
- Decode message
Many of the parameters within the functions, like the center frequency and sample rate, can be modified to values of your choosing (hardware limitations apply). Nonetheless, the code can be executed by running with the default parameters:
- Center Frequency = 915 MHz
- Sample Rate = 300 samples/second
- Data Rate = 20 kbps
- Default message = www.EEmaginations.com
IMPORTANT: If modifying the transmit frequency of the PLUTO, remember to only transmit in the ISM Band.
For individuals that do not have access to the equipment to carry out the project, DO NOT WORRY! The zipped folder contains a script that can be executed without the need of a radio. The zip also contains a sample dataset (.mat) I transmitted and received with my very own ADALM-PLUTO SDR. The dataset uses the default parameters shown above. Use the example script and dataset to experiment, and to learn more about the BPSK project before investing in extra hardware and software.
Completing the Project
To begin transmitting and receiving messages using your ADALM-PLUTO SDR, perform the following:
Type the code below, into the MATLAB command line, to repeatedly transmit the default message with default parameters listed above:
plutoTx = transmitPLUTOMessage;The following will appear in the MATLAB command line to indicate the message is being successfully transmitted:
## Establishing connection to hardware. This process can take several seconds.
## Waveform transmission has started successfully and will repeat indefinitely.
## Call the release method to stop the transmission.
To receive and decode the transmitted message with the PLUTO radio, call the following function:
[decodedMessage,rx_signal] = receivePLUTOMessage;To receive and decode the transmitted message with the RTL-SDR, call the following function:
[decodedMessage,rx_signal] = receiveRTLSDRMessage;To stop the transmission call the release function as follows:
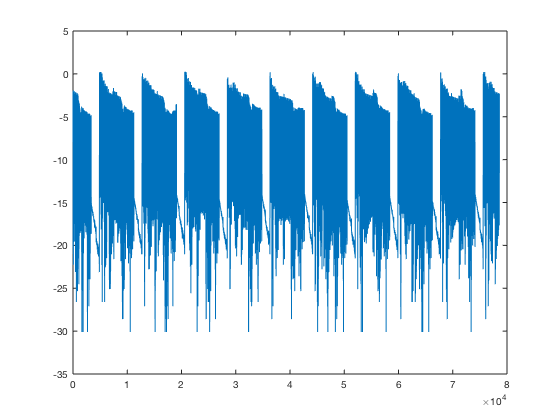
release(plutoTx);The receive message function is programmed to capture 10 frames of data. Plotting the power spectrum of the received signal should yield a plot similar to the following:
plot(10*log10(abs(rx_signal)))
The decoded message should read:
decodedMessage =

    'www.EEmaginations.com'
which is exactly what was transmitted.
The Decode Message Function
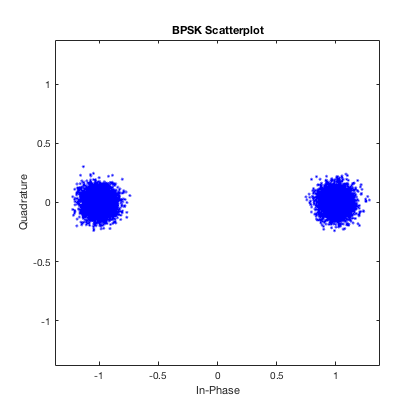
The decodeMessage function uses many of the Communication Systems Toolbox system objects to perform receiver synchronization. The coarse synchronization, carrier synchronization, and preamble detection system objects are used to compensate phase and frequency offsets in the received signal, and to determine the exact start of the message data. The simple algorithm I put together, is not enough to decode the signal 100% of the time, and you will see bit errors as a result of this. The amount of noise in your environment, multipath, and path loss are all causes for signal degradation, and make it difficult to recover the message. I leave it up to you to design a stronger algorithm, using your own methods, and/or using MATLAB’s methods, to recover the transmitted messages.
Conclusion
I hope you find this project useful, informative, and enjoyable as you explore your way through the hardware, software, and code. I ask that you improve upon the design and share! This project can be taken a step further in many ways: decode all the messages in the frame, apply higher order modulation, decode messages in near realtime, transmit different framing structures and messages types…the possibilities are endless!
Lastly, I ask that you please review and leave comments on this project, and please email me with any comments, questions, concerns, observations, things that need to be fixed, recommendations, etc.
Good luck, and have fun!!!

[…] go into some detail regarding this project. By the way, this project can be found on my website here. Going down this route can be a good opportunity to showcase even more expertise, and open some […]
This is really useful for me, a nice start from which I may learn more about SDR, and the most friendly content to me by far. Thank you David
Thank you so much!. It is really helpful, well explained and clear. Great job!
Thanks again.